Scroll down to read all articles and EH NEWS highlights!

Hydrovac or Airvac? What’s Better?
Which Method Is Faster?
Vacuum excavation is growing across Canada as the construction industry and utility owners shift to non-destructive methods to safely excavate around underground utilities and other environmental obstacles.
What was once a sector dominated by hydrovacs, air excavation has grown quickly over the last decade, leading to the obvious question, “Which method is better?”
Everyone in the industry appears to have a robust opinion on this topic. They all have unique motives for a choice for both air and hydro vacuum excavation methods. But there’s no straightforward solution about which method is better. The user must rely on multiple elements including the type of job, work situations and final job goals, in addition to site specifications.
Let’s start with a brief explanation of each method.
What Is Hydrovacing?
Hydrovacing is the process of removing or moving ground or debris using high-pressure water to cut and liquefy the targeted area of excavation, while simultaneously using an air conveyance or vacuum to transfer the ground or debris to a debris tank of the hydrovac unit. This allows for the efficient (compared to hand digging with a shovel) and non-destructive excavation of soil to expose and verify underground utilities.
What Is Air Excavation?
Air excavation or “soft dig” is a non-mechanical and less invasive method of vacuum excavation. Much like the hydrovac, the air vac simultaneously uses an air conveyance or vacuum to transfer the ground or debris to a debris tank of the unit. However, with air excavation, the operator uses a mobile air vac unit with a hand-held air spade (instead of high-pressure water wand) to loosen soil and break up any large materials. The stored spoils can be transported elsewhere or, unlike a hydrovac, if material is dry, re-used as fill.
When considering using hydro or air excavation to complete a job, there are some key factors to consider before making a final decision.
Which Method Is Faster?
Hands down a hydrovac will excavate faster in most soil types when it comes to the digging aspect of the job, but that doesn’t mean hydrovacs are always faster overall.
The big selling point of an airvac is the capability to dump spoils back onsite and the material can be reused for back filling the excavation. The unfortunate part of the hydrovac, which seems to be its hardest selling point, is the muddy spoils it creates needs to be taken offsite to a disposal location. In most situations the material must be handled by a soil reclaiming company, which may quickly drive job costs up.
Not so fast…just because the airvac can dump spoils back onsite doesn’t mean it’s the answer quite yet.
There are many customers who don’t always allow the spoils to be reused. Reasons include the material is not effective enough for compaction or it’s not suitable to cover older or sensitive utilities. These two examples are directly linked to utility companies having higher standards today than when these utilities were first buried.
Overall, it’s important to check with the customer to see if the spoils can be reused for backfill before – even if you’ve worked for them in the past – before deciding which piece of equipment is best for you.
Which Method Is Safer?
Safer for whom? Is it the operator or the utility owner?
The answer is: Both.
The method with the least chance of harming underground utilities will be the safer option for the operator and the utility owner overall.
When a particular task calls for digging close to electrical wires, air excavating is recommended because, in contrast to water, air isn’t a conductor. Air excavation is the first choice around critical or delicate job environments, such as excavations that require no harm to tree roots, fibre-optic lines or older and more fragile underground infrastructures. But don’t think air excavation unit cannot damage lines, the chances are just less.
Hydro excavation, with the high-pressure water, can create more damage in some situations, however with proper training it is a much faster way to excavate.
Make no mistake, both methods can be harmful to the utilities and lead to unsafe conditions if the operator is not trained properly. Adequate training is key.
Less Impact on Jobsites
We all know which method creates a greater mess. Hydro excavation is faster, but the water it blasts creates a slurry mess. Air excavation can also be a messy – but in the form of the dust it creates.
Both methods can create public hazards, which should be taken into consideration for each job. For instance, when working in highly populated area it’s important to realize airvacs can create a lot of dust and a hydrovac can create a lot of muddy flying debris.
The amount of airbourne hazards can be somewhat controlled with both methods. However, dust produced by an air excavator is harder contain. It comes down to how well the operator was trained to do the job and the amount of attention they put into the task. Adequate and efficient training always minimizes all hazards.
Ground Conditions
The ground conditions need to be taken into consideration on every dig site. On sites with loose soil types, such as sand and gravel and those that were pre-dug, the airvac will overpower a hydrovac unit. This is because of an airvacs unique design to vacuum dry material without creating internal machine problems with dusty materials. This includes plugged filters that create overheating issues because of air component starvation, dry material dumping and lack of vacuum.
This is where the hydrovac unit wins in a big way. A hydrovac is more versatile because it can excavate in just about any soil condition or type. Whether it is muddy, hard clay, rocky, sandy or even frozen ground conditions this machine with get the job done. With an on-board hot water heater, the hydrovac unit can dig even the most frozen ground to complete the job. This is one of the reasons why airvac units are more difficult to sell in northern parts of North America.
Which Is More Versatile?
In my opinion, this is another win for the hydrovac unit. The industry will always find different ways to use each piece of equipment in ways to help move along the jobs with ease. Because of the on-board components that the hydrovac unit is equipped with, I believe it can be more versatile. For instance, the water it carries can be used for pressure washing and the hot water heater can be used in many ways for cleaning and steaming or even thawing frozen objects.
I believe as airvac units grow in popularity the industry will find many more unique ways to use them.
Disposal Costs
To create an apples-to-apples comparison, let’s say a particular job requires the spoils – regardless of method used – to be hauled to a disposal site. There are some key points to take into consideration.
Water in the debris tank is unavoidable with a hydrovac. On average, 20 to 30 per cent of a load is water depending on ground conditions, soil type and even an operator’s level of experience.
An airvac’s debris tank fills with mostly dry material from the dig site. This means even if the airvac is a bit slower getting the load on, it will be more effective when it comes to volumes of material removed from a jobsite in a single load.
Weight is a big concern in terms of increased disposal costs as most facilities charge by the weight of the load. Because the hydrovac’s debris is a mix of soil and water, the sheer weight of the material is heavier. Additionally, it might be more difficult to find a facility that can accept wet spoils. Speaking of weight, it’s important to be aware of local DOT regulations, and that the operator is cognizant of their load.
Again, do your research and compare resources and costs.
Expense of the Unit
Now this is where it gets complicated, as I mentioned the airvac can sometimes do the job faster and less expensively because of the ability to dump onsite. However, the problem lies in the expense of the airvac unit.
A true airvac unit is just about double of its competitor, this means the rate an airvac operator charges for being dispatched to a job will be greater than that of the hydrovac. This does not mean a hydrovac is always less expensive to hire, highlighting the need to properly weigh the differences for each job.
It’s best to pre-estimate all the resources it takes to complete a project. This includes disposal of material, costs to refill a hydrovac with water and the cost of material to fill, as well as associated transportation and energy costs.
Equipment Maintenance
With the airvac being a newer option in the industry, I would have to say the hydrovac is less expensive to maintain.
There is more equipment and resources available, as well as parts centres and knowledgeable repair facilities. This means the hydrovacs can get back on the job and keep profitable more quickly. Because of an airvac’s unique design, it is an advanced package with many moving parts and technology, hence the higher price tag. This often means an owner will probably spend more time and money in maintenance.
A good understanding of the unit’s components and better trained operator, coupled with a good maintenance program, can keep these costs to a minimum.
So now knowing all these key factors is it clear which option is better overall?
The answer is: There is no one option that is better overall. Each method brings great options to the table. Ultimately, there is a place for both vacuum excavation methods across North America

Maintaining a Positive Displacement Blower
A few seconds of maintenance could save you thousands of dollars!
Maintaining a Positive Displacement Blower
The positive displacement blower is the soul of your hydrovac. Less down time in your operations comes from taking great care of it. The problem is that because these blowers always work so well, most people forget to take care of them. When it goes down it will cause your business to stop and a large amount of money is lost from very costly repairs. Trust me, this happens more often than you would think. Maintenance is always key. A few tips from Terry will keep you profitable every day.
A few seconds of maintenance could save you thousands of dollars!
1. Check oil levels: Before starting a positive displacement blower, always check oil levels. Consider putting a company procedure in place to check oil levels before turning it on. Not only should you check, but you need to keep them clean. Just like any piece of equipment, routine oil changes are always required to keep everything moving smoothly. Depending on how hard you work your blower and how dirty it is, they should be changed every 500 to 1000 hours.
2. Sufficient amount of air: Makes sure to have sufficient amount of air feeding your positive displacement blower or it will suffer and cause it to leg and create heating issues. In other words, it’s working harder than it should. Just like us, it needs air to function.
3. Monitor your inlet filter restriction indicators (if equipped): PLEASE do not depend on these indicators. Do routine visual inspections on your cyclone and blower filter. Depending on your restriction, the indicator alone may mean it’s already too late. If your displacement blower is starving for air, the internal temperature could be on the upside of 430 degrees and in some cases temperatures can reach higher than 640 degrees. If your positive displacement blower is starving, it may cause yellowish color on the rotors indicating your internal temperature has been far too high.
4. Regularly change your positive displacement blower filter: If you detect yellowish discoloration, your blower has been overheating and it’s time to act. If you don’t have the proper amount of air flow to your inlet of your displacement blower, it means it’s not getting the enough air and it is not cooling your blower down. Regularly changing your positive displacement blower filter is always a great idea. Like any piece of equipment, you want the air to be clean and free of any debris or muck. You should clean your filter and dry it properly on a daily basis. Again, putting this procedure in your daily maintenance package is a good idea.
5. Run your positive displacement blower and turn on the suction in cold conditions: If you work in cold conditions and park within a facility at night, once you pull your unit outside to warm up, you should always run your blower and turn on your suction for a few minutes. Sitting inside the shop and coming out to cold conditions will create condensation in the internals of the positive displacement blower lobes. This is why we should always run our blowers once we leave shop doors. The condensation will freeze and your blower will not turn. It doesn’t take much moisture to freeze down your blower lobes.
If your blower is frozen and you engage it after traveling to the job site, it will cost you thousands of dollars. Make it routine within your company to run your positive displacement blower every time you warm up your unit in cold conditions.
Doing routine maintenance, and paying attention to your equipment is always affordable. Not doing so is costly.
We all suck up big rocks and big chunks of earth and either pull them out of the hole or out of the way, but I would like to note that this is very hard on your positive displacement blower. It’s not something that we can always get around in our job, however try not to do so for very long. It creates too much pressure, and the positive displacement blower will do what it does best and keep building pressure and nothing will stop it. The harder your machine works, the hotter it will become. The less we do this the longer it will last, but what I have found in this industry is that it’s not something we can get around every day.

The importance of greasing your boom turret and tips on how to do it!
Whatever it is, the way you tell your story online can make all the difference.
In my 20 some years in this industry, I’m still amazed to find so many people and companies do not grease or have a maintenance plan for their boom turret – the worm and ring gear assembly at the top of the tank.
By not properly doing this simple maintenance procedure can cost you thousands of dollars!
Most manufacturers have decals on the truck and/or it’s listed in their preventative maintenance schedules in the unit’s owner manual. I’ve seen some that indicate 18 to 20 pumps weekly is good, but what some of the manufacturers don’t tell you is that the boom should be in motion while the greasing is being done.
Greasing your boom while still cradled on the truck only allows the grease to get to one section of the ring/worm gear. Therefore, when you take the boom out of its cradle and it’s rotated around the truck, the grease is only spread in a small section and not completely lubricating both the entire ring and worm gear assembly. Anybody that does it this way will eventually see problems within a few years potentially causing them to replace ring or worm gear components. This damage could easily cost upwards of $3,000 or $4,000 for each affected truck in your fleet.
So, if you want to save some money, this is how I do it to ensure maximum life out of the turret assembly components.
To start, take the boom out of its cradle and position it in the air safely away from all overhead obstructions. Have it suspended in the air just beside the truck nearest its normal racked position. With the help of a coworker, begin greasing the turret via the supplied grease points (if equipped) while the boom is in a horizontal rotating motion around the truck. Continue greasing and rotating until the boom reaches the opposite side of the truck. This will ensure the grease is applied evenly across the entire ring/worm gear assembly for maximum protection.
Here are some examples of boom turrets that have not seen proper greasing procedures:
As you can see, the light is visible through the ring gear where it mates to the top of the vacuum tank. This is caused from lack of grease as well as neglecting to check the mounting bolts on a regular basis.
When the damage has progressed this far, you will experience a loss of suction that you will actually be able to hear! This is caused by the air being drawn into the tank from around your rock-head creating a whistling sound. Ring/worm gear replacement parts will be needed at this point.
In this picture below, the boom is actually resting on top and gouging the tank. Another example of lack of proper greasing over time that could easily be prevented. The ring gear and the seals between it and the tank flange are so worn out that the entire boom assembly is now resting on the tank. At this point it’s already too late and you will be faced with a hefty repair bill to replace the entire assembly.
Other telltale signs that there is a lack of grease is when you hear a growling or grinding sound coming from the turret when uncradling your boom, it needs grease asap. While working in winter conditions/freezing temperatures and your boom will not move smoothly on the horizontal plane, this could not only mean a lack of grease. What happens is the condensation is created within the tank at night when we park our units. It creates moisture between the ring gear plates and tank flange that will literally freeze your boom in place where it rests while you drive to site. You may have seen people use hot water around their boom turret to get it moving freely again. Or they might work it back and forth until it starts to work freely again. These are sure signs of a potential lack of grease. The barrier the grease creates between the seals and tank flange can help prevent that condensation from freezing.
With most of the scenarios that I’ve pointed out the severe damage has already occurred and greasing is almost worthless because it will only fill the spaces already grooved within your ring/worm gear assemblies. When you pressurize your system, it will literally suck the new grease right out of the turret and into your tank!
Replacing the parts as soon as possible and keeping them operational by implementing a simple greasing schedule in your maintenance program will give a peace of mind that your equipment is being taken care of properly. And keeping a proper amount of suction while in work mode will help prevent overworking your Positive Displacement Blowers, thus keeping money in your pocket!
Don’t let a poor maintenance program suck up your profits. By doing simple routine maintenance and paying attention to your equipment is always affordable. Not doing so is costly.

Getting longevity out of a rotating nozzle
This article is sponsored by hydra•flex Inc.
Even though spray nozzles are a physically small component in our overall operation, they are vitally important. The success of your digging day might solely lie on how you use your nozzle to support the overall life-time wear. Using under-performing nozzles, can lead to re-spraying and reduced performance – two problems no one wants to face.
Understanding proper usage of your nozzles will help to extend the lifetime value of the nozzle and drastically increase your performance. This guide provides you with cutting edge reference tips that will help make you a more knowledgeable user of your nozzles.
First, consider these four primary questions when selecting the right nozzle for the job.
• Which nozzle can your pump support?
• What type of project will you be working on?
• What are the safety considerations?
• Is speed or water consumption more important to you?
Next, follow these recommended safety and best practice guides for extending the life of your nozzle.
Choosing the Proper Nozzle for the Job – When you choose the right nozzle for your job application, i.e. potholing, trenching, etc.) it can dramatically affect your day. Selecting the right tool for the job can reduce the run time especially if using the same tool all day.
A rotating turbo nozzle is specifically designed with a cone shaped flow pattern and is ideal for potholing applications. Typically, a rotating nozzle is less likely to do damage than the same size, same pressure straight tip nozzle. A rotating water stream contacts the substrate for a shorter duration of time.
A zero-degree nozzle is a heavy-duty, high-impact nozzle that allows you to cut through dirt faster while using dramatically less water.
Not Exceeding Pressure Ratings – Nozzles are recommended for use with high-pressure spray wand with automatic shut-off (Dead man’s switch). However, it is very important to pay attention to pressure ratings provided by manufactures. Running below those specs will allow your nozzle to extend its lifetime value.
Heat Evaluation – Understanding how much heat is enough for your nozzle is important for its ability to run long term. A nozzle is expected to deliver properly over a broad range of conditions. Many manufactures list heat ratings up to 180°F (82°C.). They will work at these heat levels, but not for very long. I have always found that 40°C is enough to get the job done.
Start Nozzles in Downward position – Most nozzles today have ceramic components that are prone to failure if not started in the down orientation. This alleviates the impact directly on the nozzle tip. Nozzles built with stronger materials like carbide tips can be started in any position, however maintaining a best practice of always starting in the downward direction will always help extend the life.
Do not submerge – Pushing the nozzle into the water or soil can force debris into the cavity that can harm the internal components. A distance of at least 2” should be maintained between the nozzle tip and the underground facility and/or subsoil. The nozzle should never be inserted into the soil.
No Probing – The water at pressure will do the job. Probing creates all kinds of issues including cover failure, broken components and dramatically decreased life spans. The wand/nozzle should also never remain motionless during excavation. Aiming directly at the underground utilities should always be avoided.
Understanding Rebuild kits and timing –
Preventative maintenance can keep the nozzle body working longer for you. Identify the recommended rebuild time by nozzle manufacture and know when to rebuild.
The dynamics between water in and water out require matching rebuild kits with the original nozzle size. If you would replace parts with the wrong components, you have rendered your nozzle immediately ineffective.
Overtightening of the ¬¬¬¬end cap can cause O-ring failures as well as parts not installed correctly can risk damaging the nozzle.
Check Nozzle Screens – Keeping the nozzle cavity free of debris will lead to longer life. Flush your equipment and make sure inlet screens are on the nozzle properly.
Proper maintenance of your equipment is key, especially is harsh conditions like winter. Same goes for the tools used every day. Follow these tips and you will be getting longer life out of your dig nozzles saving you time, money and frustrations.
Doing routine maintenance, and paying attention to your equipment is always affordable, not doing it is costly.

Water Pump Maintenance and Troubleshooting
In this article my goal is to help you keep your pumps running well to minimizing downtime. That means more money in your pocket.
I have traveled all over North America and am always surprised at how many pumps I have come across that don’t run properly. These pumps are costly and when they don’t work there is a direct impact on productivity.
In this article my goal is to help you keep your pumps running well to minimizing downtime. That means more money in your pocket.
Below you will see that I focus on two of the most popular pumps used in the Hydrovac industry. 1. Cat pumps and 2. Prattazzoli pumps. I have also added some Terry’s tips. I hope this information helps minimize your downtime.
PREVENTIVE MAINTENANCE
For pump reliability and efficiency, comply with maintenance intervals to the manufacture’s specs.
Every day
Check oil level
Clean inline water supply filters
Every 500 hours
Check oil level
Check Valves
Check valve seats
Check springs
Check Valve guides
Check H.P. seals
Check L.P. seals
Every 1000 hours
Change oil
Check or Replace: Valves, Valve seats, Valve springs, Valve guides, H.P. seals, L.P. seals
Troubleshooting the most common problems
Pump pulsates irregularly:
Air suction
Insufficient supply
Bends, elbows, fittings on the suction line are choking the passage of liquid
Suction filter is dirty or too small
The booster pump, if installed, is supplying insufficient pressure or flow rate
The pump is not primed due to insufficient head or the outlet is closed during priming
The pump is not primed due to valve jamming
Worn valves
Worn pressure seals
Faulty pressure control valve
Problems with the transmission
Pump does not make any noise upon start-up:
The pump is not primed and is running dry
No suction water
Valves are jammed
The outlet line is closed and does not allow the release of air present in the pump manifold
Pump pulsates irregularly:
Air suction
Insufficient supply
Bends, elbows, fittings on the suction line are choking the passage of liquid
Suction filter is dirty or too small
The booster pump, where installed, is supplying insufficient pressure or flow rate
The pump is not primed due to insufficient head or the outlet is closed during priming
The pump is not primed due to valve jamming
Worn valves
Worn pressure seals
Imperfect functioning of the pressure control valve
Problems on the transmission
Reduced flow or excessive noise:
Insufficient supply (see various causes as above)
Pump speed is below the rated speed
Excessive internal leakage of pressure control valve
Worn valves
Excessive leakage from the pressure seals
Cavitation due to:
Improper sizing of suction ducts/undersized diameters
Insufficient flow rate
High water temperature
Insufficient Pressure:
The user flow (nozzle) is or has become greater than the pump capacity
Abnormal revolutions per minute. – Excessive leakage from the pressure seals
Imperfect functioning of the pressure control valve
Worn valves. Pump overheats:
The pump is working in over pressure conditions or pump rpm is higher than the nominal value
Oil in the pump casing is not at level or not the recommended type
Excess belt tension or joint or pulley alignment is incorrect
Excessive pump tilt during operation
Vibrations or hammering on pipes:
Air suction
Faulty operation of pressure control valve
Valves malfunction
Non-uniformity of transmission motion
PRATISSOLI PUMPS
Oil must be changed at least once a year, as it is degraded by oxidation
For a room temperature other than between 0 °C – 30 °C, follow the instructions, considering that oil must have a minimum viscosity of 180 cSt
The pump is supplied with oil suitable for room temperatures from 0 °C to 30 °C. Recommended types of oil are indicated in the table below, these oils have additives to increase corrosion resistance and fatigue resistance. Alternatively, you can also use Automotive Gear SAE 85W-90 oil for gearing lubrication.
PREVENTIVE MAINTENANCE
Every 500 hours
Check oil level
Every 1000 hours
Change oil
Check / Replace:
Valves
Valve seats
Valve springs
Valve guides
P. seals
P. seals
Brands and types of oils recommended:
AGIP ACER220
Aral Degol BG 220
BP Energol HLP 220
CASTROL HYSPIN VG 220 CASTROL MAGNA 220
Falcon CL220
ELF POLYTELIS 220 REDUCTELF SP 220
NUTO 220 TERESSO 220
FINA CIRKAN 220
RENOLIN 212 RENOLIN DTA 220
Mobil DTE Oil BB
Shell Tellus Öl C 220
Wintershall Ersolon 220
Wintershall Wiolan CN 220
RANDO HD 220
TOTAL Cortis 220
Check the oil level and top off if necessary, using the oil dipstick. The correct checking of the oil level is made with the pump not running, at room temperature. The oil change must be made with the pump at working temperature. The quantity required is ~ 3.8 liters.
CAT PUMPS
Pump and System Preventive Maintenance Guidelines
Many application factors determine proper pump maintenance intervals. Variation in duty cycle, operating performance, fluid temperature, fluid type, inlet conditions and application environment can affect maintenance schedules. Every application should be evaluated and serviced based on its own requirements.
Water leaks or loss of system performance can be an indicator of seal wear. Seal wear has many causes, including contaminated liquid or high-temperature/run dry operation. If the low-pressure seals show wear, the high-pressure seals most likely are in a similar condition. It is a good practice to replace both low and high pressure seals and inspect plungers when leaks are present.
Cat Pumps recommends using our custom-blend premium grade hydraulic oil formulated to meet Cat Pumps specifications. For best results, perform an initial oil change after the first 50 hours of operation and every 500 hours thereafter. If other oil is used, oil change should be performed every 300 hours of operation.
If system performance degrades or changes, check seals and valves immediately. Service as required to restore system performance. Depending upon operating conditions, maintenance intervals for seals kits range between 1,500 and 8,000 hours.
Pump valves typically require changing every other seal change. Depending upon operating conditions, maintenance intervals for valve kits range between 3,000 and 16,000 hours.
Doing simple routine maintenance and paying attention to your equipment is always affordable. Not doing so is costly.

The importance of replacing the hydraulic filter in your new equipment!
Get the longevity out of your equipment that you deserve!
The importance of replacing the hydraulic filter in your new equipment!
Here’s a filter that was changed out on a new Hydrovac truck build truck only after 250 hours of operation. As you can see, the filter has been collecting debris from the truck’s hydraulic system. The debris contains particles of materials from the operating system from when it was originally built. This is why it’s very important to replace the filter after 50 hours of operating or when specified by the manufacturer. Whatever is greater.
By not replacing this filter could result in damage to your hydraulic system and could potentially jeopardize manufacturer warranty claims, and create extensive damage!
Cleaning out your system from excess debris and assuring your equipment is in a perfect running state is of the highest importance. On your next new equipment purchase, please follow your manufacturer’s manual and replace all filters as required by the manufacturer.
Get the longevity out of your equipment that you deserve!
Proactive maintenance is always the best plan to ensure less down time in the future.
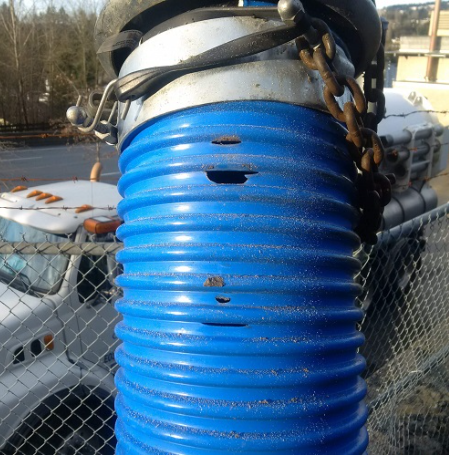
Get longevity out of your hydrovac boom hose!
Following a few simple tricks like this will make sure you don’t get “hosed” on costly repairs and down time.
We are all in business for one reason – to make money. Making money on the job site is only part of the program though. You can also make money by saving money! As the old saying goes, “If you take care of your equipment, it will take care of you.” This simply means that maintenance equals less downtime and less downtime equals more opportunity to make money.
I’d like to talk about what I’ve done to get longevity out of our boom hoses. We all know this hose is expensive, ranging anywhere from $20 to $40 a foot or more. So, how do we make boom hoses last longer to get our money’s worth?
From my experiences, this is how:
Turn your boom hose 1/4 every month. When your boom hose is hanging from your boom arm, the debris going into your tank is constantly hitting the same portions of your hose. This constant “sandblasting” will slowly, but surely wear these spots thin eventually causing it to tear and split. Also, the bends created from being cradled in your boom arm, can form “memory” in the hose making it harder to rotate. So, moving it periodically will alleviate this problem as well.
TIP: By turning the boom hose 1/4 turn every month, you’re allowing even wear inside the hose.
Here is the easiest way I have found to do this:
Un-rack the boom arm and swing it out to the side of the truck and remove your dig tube (if still attached). Scope the boom arm out to full extension and then lower it down pulling the end of the hose away from the truck so it stretches out as much as possible. Do not lower it so that it pinches the hose against the floor.
Go up top (wear your proper fall protection!) and simply relax the clap at the rock head. Leave it loosely attached around the hose flange to help hold it in place and prevent it from sliding down the boom arm. With help from other co-workers, work in unison to turn the tube a quarter-turn. You can mark it with a felt pen for reference if needed. This may take a bit of force because the tube has formed to the bend from the last time it had any attention.
Some tricks to making this easier include using a chain wrench with rags stuffed under it so it will not mark the hose. Also, using a heavy ratchet strap around the hose with the ratchet handle as your lever works too.
Done! It’s that simple!
A few minutes once a month and you will increase the life of your boom hose, therefore saving you money.
TIP: If you really want to get even more life from your boom hose, I suggest that you take the hose off your truck every 6 months and switch it end for end. The end that you were attaching your dig tube to will now be the end at the rock head.
You can do this with most Hydrovac trucks manufactured in North America, so this is definitely not brand specific.
Following a few simple tricks like this will make sure you don’t get “hosed” on costly repairs and down time.